I ran 28 real images through the tool for this TinyPNG review, and here is the short answer. TinyPNG is one of the best free image compressors you can use in 2026. It cut my main test batch by 47% overall and screenshots by up to 80%, with no quality loss I could see at normal size. The free web tool handles 20 images per session, up to 5MB each. You only need to pay ($39 a year for Web Pro) if you work with big files, or the API and WordPress plugin if you want automatic image optimization.
That is the quick version. The details are where it gets interesting.
Most TinyPNG reviews I found just repeat the homepage. "Reduces file size by up to 80%." "No visible quality loss." But none of them show real numbers from real files.
So I did my own testing.
I uploaded photos, screenshots, a transparent logo, JPGs, PNGs and WebP files. I measured every file before and after. I checked the quality with a similarity score, zoomed in to 400%, converted files to WebP and AVIF, and pushed the free plan past its limits.
Here is everything I found.
TinyPNG at a Glance
Before we get into my tests, here are the basic facts.
Details | |
|---|---|
What it is | An online image compressor, image optimizer and online image size reducer |
Made by | Tinify, a company based in the Netherlands |
Formats it compresses | PNG, JPEG, WebP, AVIF and JPEG XL |
Conversion | To AVIF, WebP, JPEG XL, JPEG or PNG, plus HEIC to JPEG |
Free limit | 20 images per session, 5MB each, 3 conversions |
Paid web plans | Web Pro $39/year, Web Ultra about $149/year |
API | 500 free compressions a month, then pay per image |
WordPress | Official TinyPNG WordPress plugin |
Account needed | No, for the free web tool |
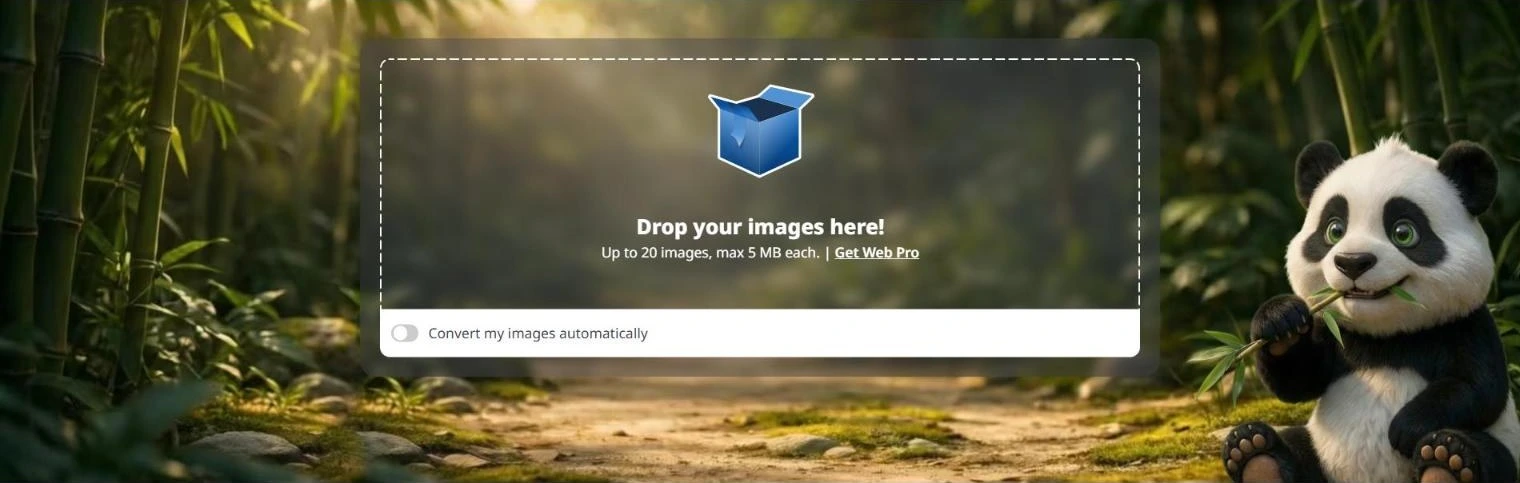 The TinyPNG upload box. The free limit is printed right under it.
What Is TinyPNG and How Does It Work?
TinyPNG is a free image compression tool that runs in your browser. You drag and drop your images into the box, and it gives you back smaller files you can download one by one or all at once.
It started as a PNG compressor, which is where the name comes from. Its sister site, TinyJPG, does the same job with a JPEG focus. Today both run on the same engine from the same company, Tinify, and both handle every format.
The secret is something TinyPNG calls "smart lossy compression."
Let me keep this plain.
A normal photo saved as PNG can hold millions of different colors. Most of them are so close to each other that your eye cannot tell them apart. TinyPNG groups those similar colors together and keeps only the ones that matter. Fewer colors means a much smaller file, and a better compression ratio.
I saw this happen in my own test. My portrait photo PNG had more than 70,000 different colors. After TinyPNG, it had exactly 256. My dashboard screenshot went from 1,655 colors to just 94. Yet both looked the same to me.
For JPEG and WebP files, it works a little differently. TinyPNG re-encodes the image with smarter settings and strips out data you do not need, like image metadata.
That is lossy compression, which means some data is thrown away for good. It works on raster images, the pixel-based image file formats you use every day. Lossless compression, which tools like ImageOptim use by default, keeps every pixel but saves far less space. TinyPNG picks the lossy side, but tries to only throw away what you cannot see.
My Test Setup: 28 Images, 3 Conversions, 1 Limit Test
I wanted my results to cover the kinds of images real people actually compress.
When and where: November 9, 2026, in Google Chrome on Windows, using the free web tool without an account.
My main batch of 7 images:
A portrait photo saved as PNG (512 x 512)
A detailed space photo from NASA, saved as JPG (1000 x 872)
A coffee cup photo saved as a high-quality JPG
A rocket photo that was already compressed for the web (JPG)
A cat photo saved as WebP
A screenshot of a web dashboard with text and a chart (PNG, 1440 x 900)
A transparent logo with a soft shadow (PNG, 1200 x 1200)
Then I tested:
Converting 3 images to WebP and AVIF
Uploading 21 more images in one go, to see what happens past the free limit
How I measured quality: I downloaded each compressed file in the browser and compared it pixel by pixel with my original. I used a standard similarity score called SSIM, where 1.000 means the two images are identical. Anything above about 0.95 is very hard to tell apart without zooming in.
TinyPNG Review Results: How Much Each Image Shrank
Here are the real numbers from my main batch.
Image | Format | Before | After | Saved | Similarity |
|---|---|---|---|---|---|
Dashboard screenshot | PNG | 103 KB | 20 KB | 80% | 0.999 |
Transparent logo | PNG | 90 KB | 24 KB | 73% | 0.998 |
Portrait photo | PNG | 444 KB | 126 KB | 72% | 0.986 |
Cat photo | WebP | 29 KB | 12 KB | 58% | 0.957 |
Coffee photo | JPG | 105 KB | 57 KB | 46% | 0.974 |
Rocket photo (already compressed) | JPG | 113 KB | 66 KB | 41% | 0.976 |
Space photo | JPG | 528 KB | 448 KB | 15% | 0.984 |
Total | 1,411 KB | 754 KB | 47% |
All 7 images were done in about 8 seconds.
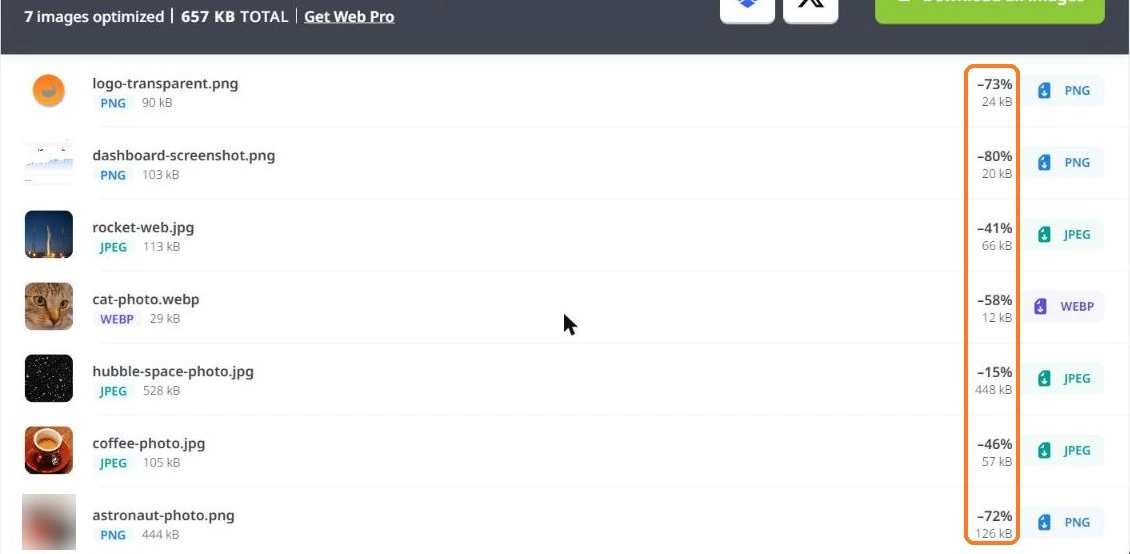 My first batch of 7 images, with the savings for each file. Total saved: 47%.
The pattern is clear. PNG files got the biggest savings by far. Screenshots, logos and graphics shrank by 73% to 80%. Photos saved as PNG did almost as well.
JPG files saved less, between 15% and 46%. That makes sense. A JPG is already a compressed format, so there is less fat left to trim.
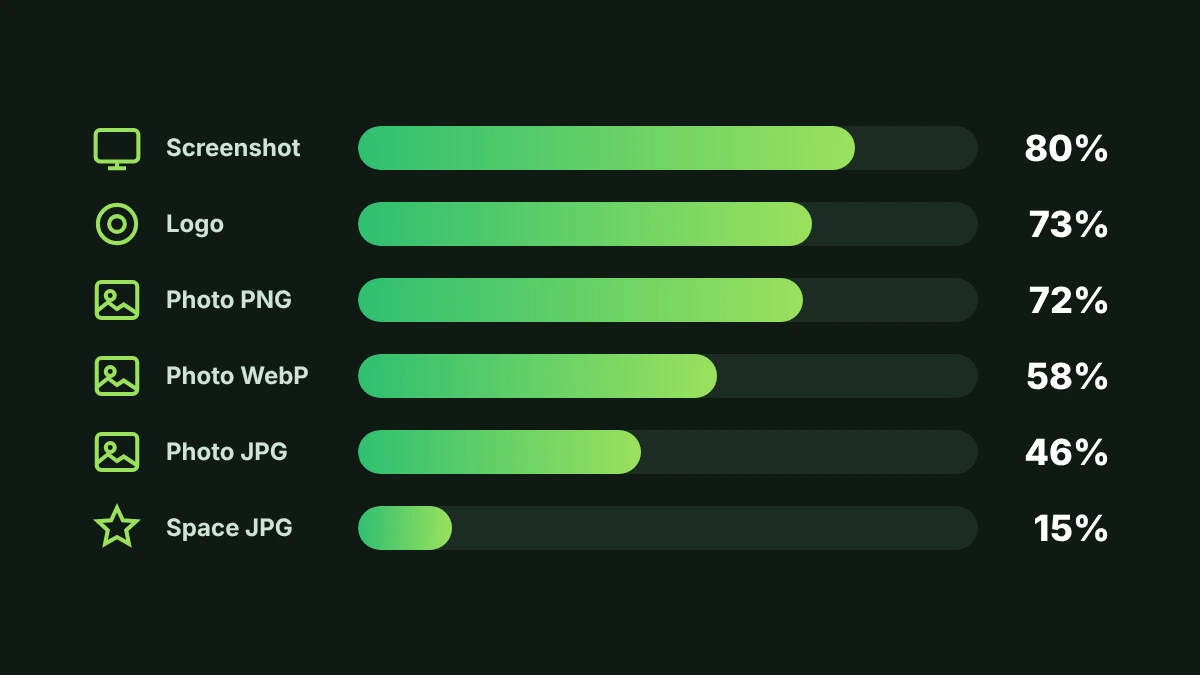 How much TinyPNG shrank each type of image in my test.
Did the Images Lose Quality?
This is the question everyone asks. Does TinyPNG reduce image quality?
Technically, yes. Every file lost some data. That is how lossy compression works.
But in practice, I could not see the difference at normal size on any of my 7 images. The similarity scores back this up. Six of seven scored 0.97 or higher. The screenshot and logo were almost perfect copies at 0.999 and 0.998.
To be sure, I zoomed into the coffee photo at 400%.
 Original JPG (left) vs TinyPNG (right) at 400% zoom. The file on the right is 46% smaller.
Even at that zoom, I had to look hard. The fine grain in the coffee is a little smoother on the right. That is it.
On my portrait PNG, zooming to 500% showed a very fine grain on the skin. That grain is "dithering," the trick TinyPNG uses to fake smooth color with only 256 colors. At normal size, it is invisible.
Transparency also survived. My logo kept its transparent background and its soft shadow edges, which is where a lot of compressors fail.
Where TinyPNG Struggled
Two results are worth knowing about.
Busy, detailed photos save less. My NASA space photo is full of tiny stars and noise. TinyPNG only cut it by 15%. Images with lots of fine detail simply do not compress well with any tool.
Already-compressed JPGs take the biggest quality hit. My rocket photo had already been compressed for the web. TinyPNG still cut another 41%, but it had the lowest pixel-by-pixel accuracy score in my test. It still looked fine to me at normal size, but this is the one case where I would compare before and after.
My tip: always compress from your original, high-quality file. Do not run the same image through TinyPNG twice.
Converting to WebP and AVIF: The Biggest Savings
This is the feature most TinyPNG reviews skip, and it is where I saw the biggest wins.
Turn on "Convert my images automatically," pick your formats, and TinyPNG creates new versions of your images. It supports AVIF, WebP, JPEG XL, JPEG and PNG.
 The free plan lets you convert 3 images per session to AVIF, WebP, JPEG XL, JPEG or PNG.
I converted 3 images to both WebP and AVIF. Here is what I got.
Image | Original | TinyPNG (same format) | WebP | AVIF |
|---|---|---|---|---|
Coffee photo | 105 KB (JPG) | 57 KB | 30 KB | 23 KB |
Dashboard screenshot | 103 KB (PNG) | 20 KB | 16 KB | 12 KB |
Transparent logo | 90 KB (PNG) | 24 KB | 20 KB | 11 KB |
The coffee photo went from 105 KB to 23 KB as AVIF. That is 78% smaller than my original, and less than half the size of the compressed JPG.
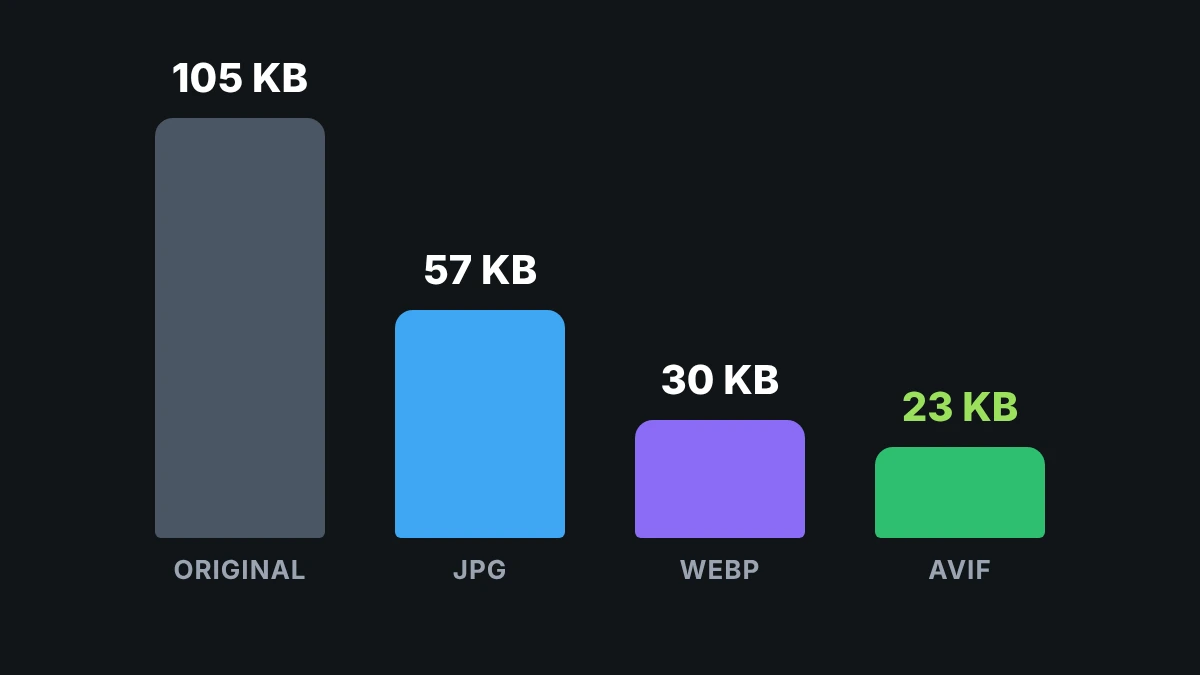 The same coffee photo after TinyPNG, in three formats.
The transparent logo kept its transparency in both WebP and AVIF, which is great for websites.
One small catch. On my dashboard screenshot, AVIF was the smallest, but when I zoomed in, I could see faint blocky patches around the large numbers. For screenshots with lots of text, I would pick WebP or the compressed PNG instead. For photos, AVIF was the clear winner.
The limit: the free plan only lets you convert 3 images per session. Web Pro also caps you at 3. Only Web Ultra gives you unlimited image conversion.
Key Features of TinyPNG
Beyond the basic upload box, here is what TinyPNG offers.
Drag-and-Drop Web Compressor
The online image compressor is the heart of TinyPNG. No account, no install, no settings to learn. You drop files in and download the results. It is the most user-friendly tool of its kind I have used.
There are no image quality settings to adjust, though. TinyPNG decides how far to compress each image for you. Some people love that. Others want more control.
Bulk Image Compression
You can upload up to 20 images at once on the free plan. I tested this by dropping 21 images in at the same time.
The first 20 were compressed right away. Image number 21 was locked with a "Maximum uploads reached (max 20)" message and an offer to upgrade.
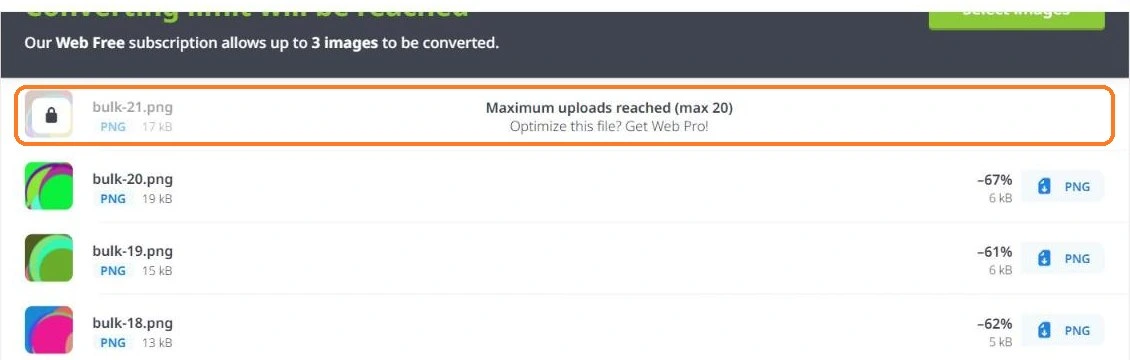 Image number 21 was locked behind the Web Pro upgrade.
One thing I noticed: the limit is per session, not per month. When I reloaded the page, the counter started fresh.
With a paid plan, batch image compression has no limit, and Web Ultra even lets you upload entire folders.
TinyPNG API for Developers
The TinyPNG API lets developers build image compression into their own apps, websites and build scripts. It has official libraries for Ruby, PHP, Node.js, Python, Java and .NET, and it works with any HTTP client, so developer integration is simple.
As an image compression API, this is the right choice for automatic image optimization at scale, like compressing every image a user uploads to your app. If you are building something like that, we keep a list of developer tool deals that can help you cut your other costs.
TinyPNG WordPress Plugin
The official plugin, "TinyPNG Image Optimization," has over 100,000 active installs and a 4.5 star rating on WordPress.org. This WordPress integration compresses images as you upload them, can convert them to WebP or AVIF, and can resize huge originals automatically.
It also has an option to keep metadata like copyright and GPS location. By default, that image metadata is removed, which helps file size and privacy.
Image CDN and Website Analyzer
TinyPNG also offers an image CDN that compresses and delivers images on the fly, and a free website analyzer that scans your pages for images you could optimize. I did not test these in depth, but the analyzer is a handy free starting point for any website speed project. I also did not test animated PNG files, so I cannot speak to how well those compress.
TinyPNG Pricing: Free vs Web Pro vs Web Ultra vs API
TinyPNG has three ways to pay: web plans, the API, and the CDN. Here are the web plans, checked on the official pricing page in November 2026.
Plan | Price | Compressions | Max file size | Conversions |
|---|---|---|---|---|
Web Free | $0 | 20 per session | 5 MB | 3 per session |
Web Pro | $39/year ($3.25/month) | Unlimited | 75 MB | 3 per session |
Web Ultra | About $149/year ($12.42/month) | Unlimited | 150 MB | Unlimited |
Both paid plans are billed yearly, per user, like any premium subscription. They also add faster processing and remove ads.
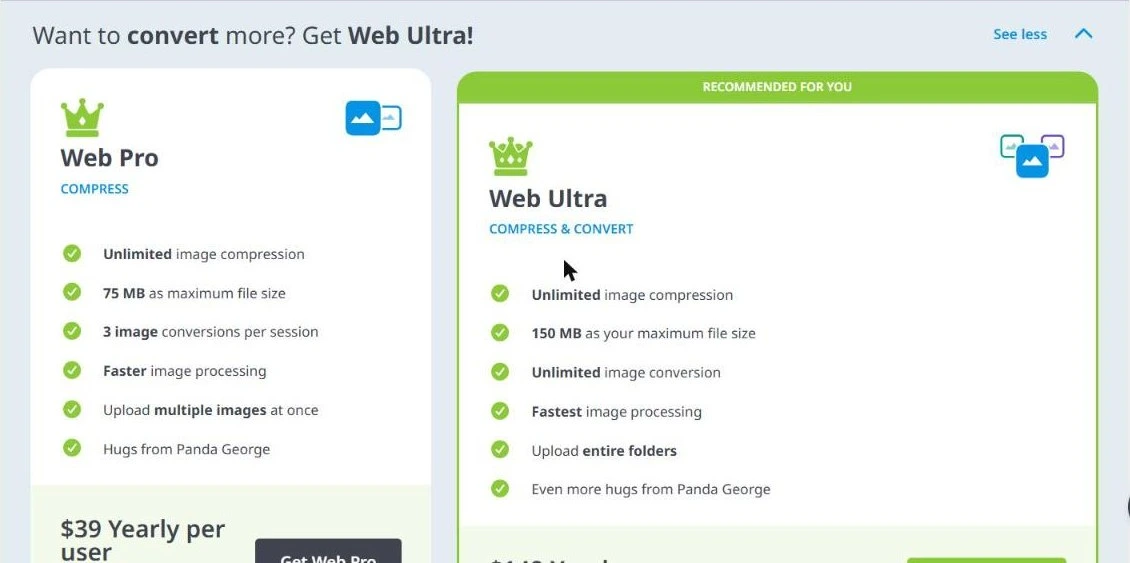 The upgrade panel I saw after using my 3 free conversions.
The API is priced per image:
First 500 compressions each month: free, no card needed
From 501 to 10,000: $0.009 each
Above 10,000: $0.002 each
Prepaid credit bundles are also available
There are no hard API request limits on the free tier beyond the 500 monthly compressions. After that, you simply pay per image.
Here is what that means in real money. If you compress 1,000 images in a month, you pay $4.50. If you compress 20,000, you pay about $105.50.
The WordPress plugin uses the same API credits. This is the part that catches people out. WordPress creates several sizes of every image you upload, and each size counts as one compression. So 500 free credits covers only about 100 images a month on a normal site, or about 50 if you also convert to WebP or AVIF.
Since we cover deals here at SaaSOnDeal, I checked for discounts too. TinyPNG does not offer a coupon or a public discount code. The free tier is the real deal. You can browse our current SaaS deals for other tools.
Is paying worth it? For most bloggers and small businesses, the free web tool is enough. I would only pay for Web Pro if you regularly handle files bigger than 5 MB, like raw photos from a camera.
Is TinyPNG Safe for Your Images?
Yes, TinyPNG is a safe, legitimate tool. It has been around for more than a decade and is used by big brands.
But there is one thing you should understand. Your images are uploaded to TinyPNG's servers. Image processing does not happen on your computer. It happens in the cloud.
TinyPNG says on its own page that only you can access the images you upload, and that it keeps them for a maximum of 48 hours before deleting them for good. The company is based in the Netherlands, so it falls under strict European privacy rules.
For website images, product photos and blog graphics, that is perfectly fine.
For private photos, ID cards, medical scans or confidential designs, I would not upload them to any online compressor. Use a tool that works on your own device instead, like Squoosh or ImageOptim, which I cover below.
Does TinyPNG Help With SEO and Core Web Vitals?
Yes, and this is the main reason I use it. File size reduction is one of the easiest wins for website performance.
Images are often the heaviest files on a web page. And the biggest image on the screen is usually what Google measures for Largest Contentful Paint (LCP), one of the Core Web Vitals.
Google says a good LCP is 2.5 seconds or less. You can read the full explanation in Google's LCP guide on web.dev.
Smaller images help in a few simple ways:
Faster page load time, especially on mobile performance where connections are slower
Better image loading speed for your hero images, which often decide your LCP score
Less bandwidth consumption, which matters if your hosting charges for it
Less server storage, which adds up fast on image-heavy sites
My dashboard screenshot shrank from 103 KB to 12 KB as AVIF. On a page with 10 images like that, you save almost 1 MB of data per visitor.
But TinyPNG is only one part of SEO image optimization. You still need correct image resizing (do not upload a 4000 pixel photo for an 800 pixel slot), responsive images, lazy loading, and good alt text. A content delivery network (CDN) also helps with image delivery around the world.
TinyPNG Strengths and Weaknesses
What I liked | What I did not like |
|---|---|
Big savings: 47% overall, up to 80% on screenshots | No quality slider or manual image quality settings |
No quality loss I could see at normal size | Only 3 free conversions per session |
Keeps transparency in PNG, WebP and AVIF | 5 MB max file size on the free plan |
Converts to WebP, AVIF and JPEG XL | Images are uploaded to their servers |
No account needed for the web tool | WordPress plugin credits run out fast |
Strong API and WordPress plugin | Web Pro still limits you to 3 conversions |
Fast: 7 images in about 8 seconds | Busy, detailed photos save very little |
TinyPNG vs Squoosh, ShortPixel and Other Alternatives
TinyPNG is not the only option. Here is how it compares with the tools I see recommended most.
Tool | Type | Free plan | Best for |
|---|---|---|---|
TinyPNG | Web, API, WordPress | 20 images per session | Quick, high-quality results with no settings |
Squoosh | Web app (in browser) | Free, one image at a time | Privacy and full quality control |
ShortPixel | WordPress, web, API | 100 credits a month | WordPress sites with lots of images |
Imagify | WordPress plugin | 20 MB a month | WordPress users who want simple settings |
Web and API | Small free allowance | Developers who want an alternative API | |
Optimizilla | Web | Free, up to 20 images | Adjusting quality with a slider |
Web | Free | Quick one-off compression | |
ImageOptim | Mac app | Free | Lossless compression on your own computer |
Is TinyPNG better than Squoosh? It depends on what you need. Squoosh, made by Google's Chrome team, runs entirely in your browser, so your images never leave your device. It also gives you full control over quality and format. But it handles one image at a time. TinyPNG is faster for batches and makes the decisions for you. I use TinyPNG for batches and Squoosh for private images or one image I want to fine-tune.
ShortPixel and Imagify are better fits if you only care about WordPress. ShortPixel gives 100 free credits a month, and its Unlimited plan is $9.99 a month. Imagify's free plan covers 20 MB a month.
Adobe Photoshop can also export smaller images, but you have to set the quality by hand for every file. TinyPNG does that thinking for you.
My Recommended TinyPNG Workflow
After testing, this is the image optimization workflow I would follow, depending on who you are. The goal is always the same: optimized images with real image quality preservation.
Bloggers: Resize images to the width your theme actually shows. Then drop them into the free web tool before uploading. Use AVIF or WebP for your featured images if your site supports them.
Designers: Use the free tool for client previews and mockups. Pay for Web Pro only if you regularly handle files over 5 MB.
Developers: Use the TinyPNG API in your build step or upload pipeline. 500 free compressions a month is enough to test it properly.
Online store owners: Product photos are where you will see real gains. If you add many products a week, the API or a WordPress plugin will save you hours of manual work.
Anyone with private images: Use Squoosh or ImageOptim instead, so nothing leaves your computer.
Final Thoughts: Is TinyPNG Worth It in 2026?
After 28 images, 6 conversions and one locked upload, my answer is yes.
TinyPNG does exactly what it promises. It cut my main batch nearly in half with no quality loss I could see at normal size. For screenshots and graphics, the savings were huge. And the WebP and AVIF conversion took my photo down by 78%.
It is not perfect. There is no quality slider, the free conversion limit is tight, and you have to be comfortable uploading your images.
But for most people, the free web tool is all you will ever need. That is rare in 2026.
My rating: 9 out of 10. It is the first tool I would recommend to anyone who wants smaller images without learning anything new.
TinyPNG FAQ
What is TinyPNG used for?
TinyPNG is used to make image files smaller without visible quality loss. People use it to speed up websites, save storage space, send images by email, and improve Core Web Vitals scores. It also converts images between formats like PNG, JPEG, WebP and AVIF.
Is TinyPNG free?
Yes. The web tool is free for up to 20 images per session, 5 MB each, with 3 conversions per session. The API is free for 500 compressions a month. Paid web plans start at $39 a year for Web Pro.
Is TinyPNG safe to use?
Yes. TinyPNG is run by Tinify, an established company in the Netherlands. It says uploaded images are only accessible to you and are deleted after a maximum of 48 hours. Still, avoid uploading private or confidential images to any online tool.
Does TinyPNG reduce image quality?
Technically yes, because it uses lossy compression. But in my test, I could not see any difference at normal size. My images scored between 0.957 and 0.999 on a similarity scale where 1.000 means identical.
Which image formats does TinyPNG support?
TinyPNG compresses PNG, JPEG, WebP, AVIF and JPEG XL files. It can convert images to AVIF, WebP, JPEG XL, JPEG or PNG, and it can turn HEIC photos from iPhones into JPEG.
Can TinyPNG compress multiple images at once?
Yes. The free web tool handles up to 20 images at once. In my test, the 21st image was locked until I upgraded. Paid web plans remove this limit, and Web Ultra can upload whole folders.
What is the maximum file size supported by TinyPNG?
The free plan accepts images up to 5 MB each. Web Pro raises that to 75 MB, and Web Ultra to 150 MB.
Does TinyPNG support WebP and AVIF?
Yes. It compresses WebP and AVIF files and can convert other images into both formats. In my test, converting a JPG photo to AVIF made it 78% smaller than the original.
Is TinyPNG good for website SEO?
Yes. Smaller images load faster, which helps your page speed and your Largest Contentful Paint (LCP) score, both of which matter for SEO. Just remember to also resize your images, use responsive images and write good alt text.
What is the difference between TinyPNG and TinyJPG?
There is no real difference today. They are two websites from the same company, Tinify, using the same compression engine. TinyPNG started with PNG files and TinyJPG with JPEG files, but both now handle all supported formats.
Is TinyPNG better than Squoosh?
TinyPNG is better for compressing many images quickly with no settings. Squoosh is better for privacy, since it works on your own device, and for fine control over quality. I use both, for different jobs.
Are there any good alternatives to TinyPNG?
Yes. Squoosh, ShortPixel, Imagify, Kraken.io, Optimizilla, Compressor.io and ImageOptim are all solid options. ShortPixel and Imagify are best for WordPress, while Squoosh and ImageOptim are best if you want to keep images on your own device.